The only available test framework that’s provided out of the box with ASP.NET MVC 3 is the Visual Studio Unit Test framework. This article, based on chapter 23 of ASP.NET MVC 3 in Action, shows you how to create and install custom test project templates and view engine options.
This article is based on ASP.NET MVC 4 in Action, Third Edition, to be published May 2012. It is being reproduced here by permission from Manning Publications. Manning early access books and ebooks are sold exclusively through Manning. Visit the book’s page for more information.
The ASP.NET MVC Framework gives us some built-in templates, but different teams have different standards regarding view engines and test projects. This article provides guidance for registering custom test project templates as well as templates for third-party view engines.
Adding a custom test project template to the new project wizard
When you first create an ASP.NET MVC project, you’re greeted by the dialog box shown in figure 1.
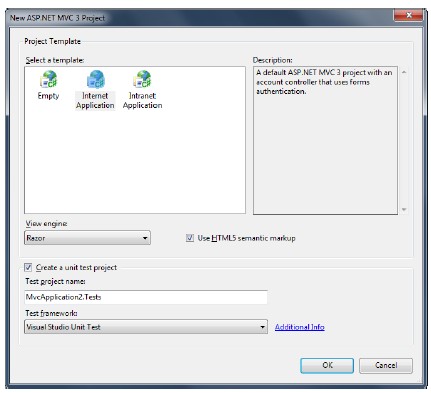
Figure 1 When you create a new project, you’re asked if you want to create a unit-test project.
Unfortunately, the only available test framework that’s provided out of the box is the Visual Studio Unit Test framework. Developers who are experienced with testing will no doubt prefer NUnit, MbUnit, or xUnit.NET. But there’s hope! You can add your preferred framework to this dialog box (and simultaneously implement a custom project template).
The first step is to create a project that serves as the template. It should contain what you want to see when you create new ASP.NET MVC applications using the template. Use NuGet to add NUnit, MvcContrib.TesterHelper and any other libraries you normally use in test projects. Make sure the non-GAC references (such as NUnit and MvcContrib.TestHelper) are set to Copy Local. Then choose File > Export Template. Figure 2 shows the dialog, which contains several options.
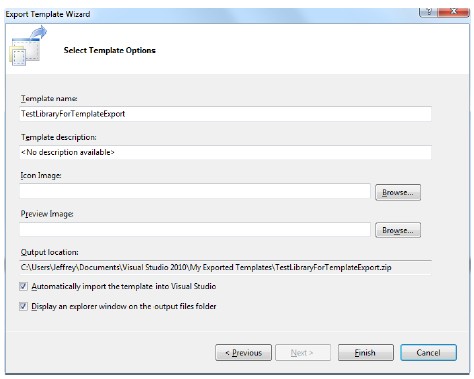
Figure 2 Template options include the export path as well as an option to import the template into Visual Studio.
Follow the wizard, which will result in a single zip file. Distribute the zip file to your team and have them copy this zip file to C:\Program Files (x86)\Microsoft Visual Studio 10.0\Common7\IDE\ProjectTemplates\CSharp\Test.
Note: On 32-bit machines, the Program Files path is actually C:\Program Files\. Make adjustments for your system.
Once you’ve got the template in the right place, close all instances of Visual Studio, open the Visual Studio 2008 Command Prompt (as Administrator if UAC is enabled), and run this command:
devenv /installvstemplates
This will take a few seconds while the command installs the project template into Visual Studio.
Now, open regedit and navigate to the following location:
* HKEY_LOCAL_MACHINE\SOFTWARE\Wow6432Node\Microsoft\VisualStudio\9.0\MVC2\TestProjectTemplates
Note: On 32-bit machines, the registry path is slightly different (remove Wow6432Node).
In table 1, you’ll find the default Visual Studio Unit Test key String values. To create options for another test framework, create a new key here, and then add the String values in table 1.
Table 1 Registry values for configuring the unit-test project settings
| Value | Description |
| Package | Blank, unless you have a custom Visual Studio package GUID to register here. |
| Path | Usually CSharp\Test. |
| TestFrameworkName | The name that you want to appear in the Unit Test Framework dropdown list. |
| AdditionalInfo | A URL that provides the user with more information about your framework or template. When the user clicks Additional Info, the browser will navigate to this URL. |
| Template | The name of the zip file that contains the template. |
Figure 3 shows a new template installed in this location.

Figure 3 Adding a registry entry for a new custom test project template. Note that this registry path is for 64-bit machines.
With all of this in place, we can launch Visual Studio, create a new ASP.NET MVC Web Application project, and you’ll see the message shown in figure 4.
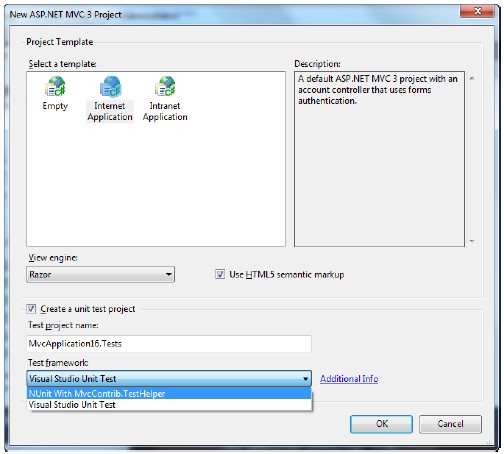
Figure 4 Our new test template is now available in the test framework dialog box.
For most enterprise development teams, registering a custom test project template might be overkill because these teams often don’t create new ASP.NET MVC projects each week. For web agencies or teams that create new web applications frequently, this capability will be indispensable. Now that we can customize the test framework to use, we have one more option to choose in figure 4. Customizing the view engine dropdown list is what we will explore next.
Registering a custom view engine in Visual Studio
If you create lots and lots of ASP.NET MVC web applications using a view engine other than Razor or ASPX, you may consider adding it to the New ASP.NET MVC 3 Project dialog that appears when creating a new project. Unfortunately, this didn’t make the feature cut, and Microsoft-provided explicit project templates for Razor and ASPX. For instance, if you select Razor, Visual Studio will use the project template found in the MvcWebApplicationProjectTemplatev3.01.cshtml.zip file that is installed with ASP.NET MVC 3. Since the first versions of ASP.NET MVC, the Spark view engine has gained some popularity. If you have an existing investment in the Spark view engine, you can use this section to customize Visual Studio to offer it as a choice when creating views. Besides serving as views, Spark is especially useful when creating templates text, such as dynamic email or offline reports. Since Spark can be executed without references to HttpContext, you can use it for all of your text templating needs.
We’ll now show you how to add Spark T4 templates to Visual Studio. This article assumes some knowledge of the Spark view engine. Here, we will just cover how to register it to appear as an option.
Visual Studio 2010 stores all item templates for views in the folder at C:\Program Files (x86)\Microsoft Visual Studio 10.0\Common7\IDE\ItemTemplates\CSharp\Web\MVC 3\CodeTemplates\AddView. Figure 5 shows the newly created Spark folder. You will need to create this folder and add the Spark T4 templates that you have decided to use. You can find some publicly available templates at http://guiftp.free.fr/SparkViewTemplates.rar.
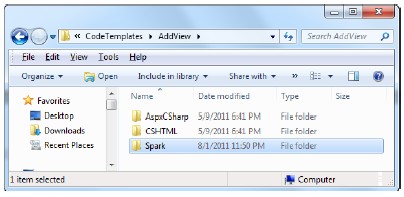
Figure 5 Create the Spark folder next to the built-in view item templates.
After creating this folder, add the T4 templates you will be using to scaffold your Spark views. You will also need to add a special file named ViewEngine.xml. Here are the contents of the ViewEngine.xml file.
<?xml version="1.0" encoding="utf-8" ?>

<ViewEngine DisplayName="Spark"

ViewFileExtension=".spark"

DefaultLayoutPage="~/Views/Shared/Application.spark"

PartialViewFileExtension=".spark" />
After these steps, the final task is to shut down Visual Studio and then restart it. You should now be able to use the Add View… scaffolding to create your Spark view.
Note: The Spark distribution does not provide T4 templates because Spark is a templating language usable in more scenarios than just ASP.NET MVC. You can download the latest stable release at http://sparkviewengine.codeplex.com/. Then, you can translate the Razor T4 templates into templates that will output Spark syntax.
Remember that with ASP.NET MVC, you can easily mix and match views from different view engines in the same project. This is very important when upgrading existing applications to the latest version of ASP.NET MVC. Figure 6 shows how you’re able to add a Spark view right next to an existing Razor view.
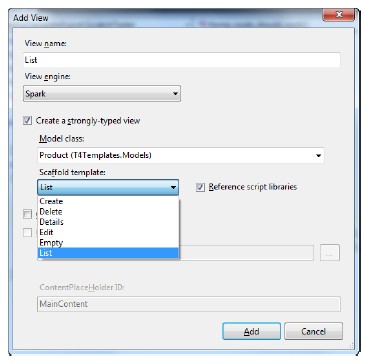
Figure 6 With Spark registered, you’re able to leverage T4 scaffolding to generate Spark views.
We now have the ability to add new views using the Spark view engine in our ASP.NET MVC 3 project.
Summary
You’ve seen how to create and install custom test project templates and view engine options. Whether you are using it for templating web pages, sending custom emails, or formatting offline reports, you can now use the Spark view engine from Visual Studio just as easily as the built-in view engines.
